Securing CICD pipelines with StackRox / RHACS and Sigstore
How can we ensure that our supply chain is secured, and all the container images deployed in our Kubernetes clusters are signed and secured, and no one can deploy malicious container images? How can we Sign and Verify container images within the CICD Pipelines, adding Security to our DevOps pipelines?
This is the third blog post of the series of Secure CICD pipelines using Sigstore and Open Source security tools.
Check the earlier posts in:
- I - Signing and Verifying Images to Secure CICD pipelines using Sigstore and Kyverno
- II - Signing and Verifying Images to Secure CICD pipelines using Sigstore and Kyverno - (Part II)
Let’s dig in!
1. Overview
In the previous blog posts we’ve used Kyverno and Sigstore to secure the CICD pipelines within Tekton. Furthermore we worked with GitHub registry to store the signatures of the images that we built, and to store the images that our Tekton Pipelines produced.
But these are not the only options that we have for securing our CICD pipelines.
Let’s discover how other Open Source tools like StackRox / RHACS and Quay can help, alongside with Sigstore to sign, verify and enforce our CICD / DevOps pipelines.
As in the previous blog posts we will start from a typical CICD pipeline where we build - bake - deploy our container images in our Kubernetes / OpenShift clusters.
And then we will use several components that will help us to secure this pipeline:
-
Cosign: Open Source tool within Sigstore project that provides image-signing and verification, so we can sign our container images, to ensure that our container image stored in our registry is signed properly and also the signature is stored within the Registry and always available to be verified.
-
Quay: Open Source container registry that stores, builds, and deploys container images. It analyzes your images for security vulnerabilities, identifying potential issues that can help you mitigate security risks. NOTE: we will use the SaaS option, Quay.io in this blog post but it’s totally possible to reproduce this demo in the non SaaS Quay.
-
StackRox: StackRox Kubernetes Security Platform performs a risk analysis of the container environment, delivers visibility and runtime alerts, and provides recommendations to proactively improve security by hardening the environment. Red Hat offers their supported product based on StackRox, Red Hat Advanced Security for Kubernetes.
On the other hand, ArgoCD / OpenShift GitOps and Tekton Pipelines / OpenShift Pipelines will be also used in this demo as we did in the previous examples.
Finally all the files and code used in the demo are available in the K8S sign-acs repository.
NOTE: All the demo will be deployed in an OpenShift 4 cluster, but also vanilla K8S can be used, using OLM by modifying the namespaces used.
2. Installing ArgoCD and Tekton
Because we will install all the pieces using ArgoCD and GitOps, we need first to bootstrap ArgoCD cluster. We will use OpenShift GitOps based in ArgoCD in this case.
- Clone the repository and checkout into the proper branch:
git clone https://github.com/rcarrata/ocp4-network-security.git
git checkout sign-acs && cd sign-images
- Install OpenShift GitOps / Pipelines (ArgoCD and Tekton):
until kubectl apply -k bootstrap/; do sleep 2; done
- After couple of minutes check the OpenShift GitOps / ArgoCD and Pipelines / Tekton components are up && running:
ARGOCD_ROUTE=$(kubectl get route openshift-gitops-server -n openshift-gitops -o jsonpath='{.spec.host}{"\n"}')

curl -ks -o /dev/null -w "%{http_code}" https://$ARGOCD_ROUTE
3. Quay.io Repository Setup
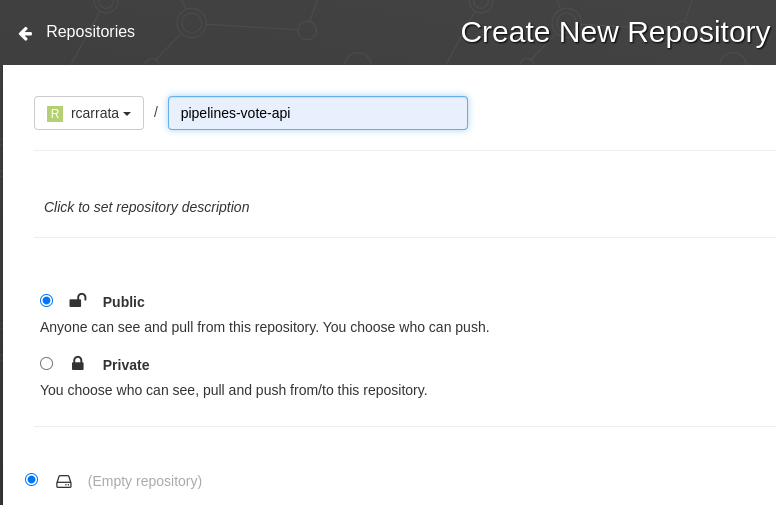
We need a repository for storing our container images generated in our pipeline, for this reason we will generate an empty public quay.io repository and we will grant the proper RBAC and security to use them in our pipelines.
- Add a Public Quay Repository in Quay.io (we’ve used pipelines-vote-api repository as an example):
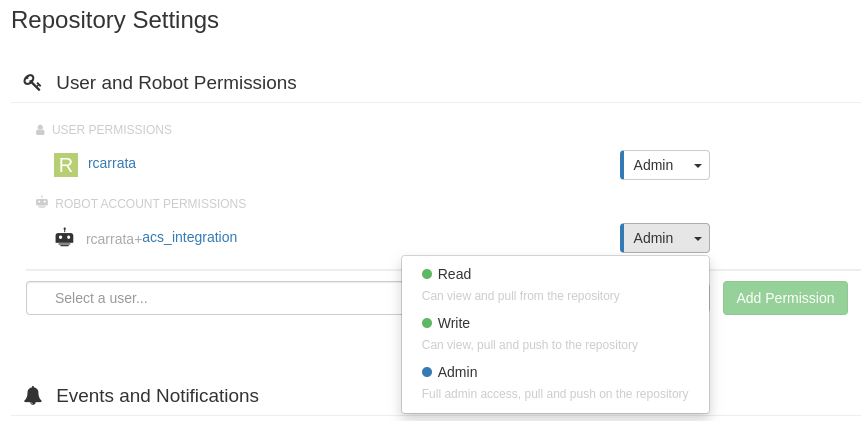
- In the Settings repository, add a Robot Account user and assign Write or Admin permissions to this Quay Repository:
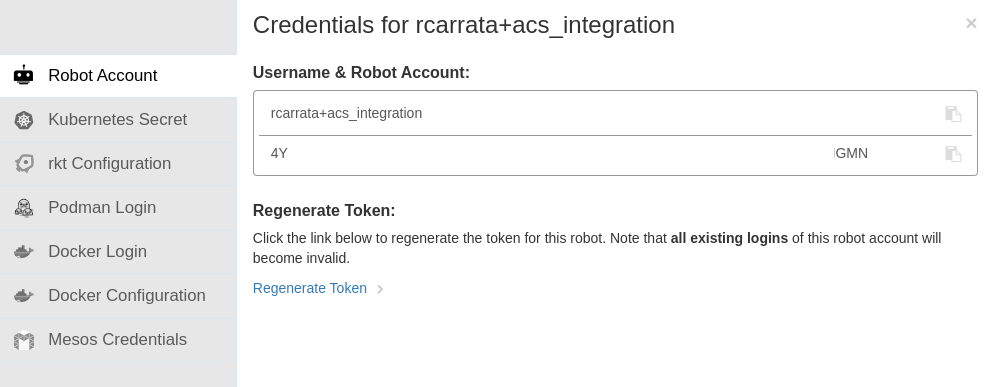
- Grab the QUAY_TOKEN and the USERNAME that is shown within the Robot Account generated in the previous step:
and export into your shell:
export USERNAME=<Robot_Account_Username>
export QUAY_TOKEN=<Robot_Account_Token>
3.1 Configure Quay credentials and RBAC in K8S/OCP Cluster
Now that we’re generated a Quay account with the proper RBAC (robot account), we need to set these credentials within the K8s / OCP ${Namespace} in our cluster, in order to be able to pull the images from within the Tekton Pipelines:
- Export the token for the GitHub Registry / quay.io:
export QUAY_TOKEN=""
export EMAIL="xxx"
export USERNAME="rcarrata+acs_integration"
export NAMESPACE="demo-sign"
- Create the namespace for the demo-sign:
kubectl create ns ${NAMESPACE}
- Generate a docker-registry secret with the credentials for Quay Registry to push/pull the images and signatures:
kubectl create secret docker-registry regcred --docker-server=quay.io --docker-username=${USERNAME} --docker-email=${EMAIL}--docker-password=${QUAY_TOKEN} -n ${NAMESPACE}
- Add the imagePullSecret to the ServiceAccount “pipeline” in the namespace of the demo:
export SERVICE_ACCOUNT_NAME=pipeline
kubectl patch serviceaccount $SERVICE_ACCOUNT_NAME \
 -p "{\"imagePullSecrets\": [{\"name\": \"regcred\"}]}" -n $NAMESPACE
oc secrets link pipeline regcred -n demo-sign
4. Deploy Tekton Demo Tasks and Pipelines using GitOps
Let’s deploy now the several demo tasks and pipelines that are needed for this demo. We can deploy it manually… or use GitOps to deploy them automatically!
- Create an ArgoCD App for deploying all the Tekton Pipelines, Tasks and other CICD components needed for these demo:
cat <<EOF | kubectl apply -f -
apiVersion: argoproj.io/v1alpha1
kind: Application
metadata:
  name: signed-pipelines-app
  namespace: openshift-gitops
spec:
  destination:
    namespace: demo-sign
    server: https://kubernetes.default.svc
  project: default
  source:
    path: sign-images/manifests
    repoURL: https://github.com/rcarrata/ocp4-network-security
    targetRevision: sign-acs
  syncPolicy:
    automated:
      prune: true
      selfHeal: true
    syncOptions:
    - CreateNamespace=true
EOF
After a couple of minutes our ArgoCD app will deploy every manifest that is needed within our Kubernetes / OpenShift cluster:
5. Install StackRox / RHACS using GitOps
Now it’s time to install StackRox / RHACS in our cluster of K8s/OCP. We will use again GitOps to deploy all the components needed.
- We will be using the ACS GitOps repository within our ArgoApp to deploy StackRox:
cat <<EOF | kubectl apply -f -
apiVersion: argoproj.io/v1alpha1
kind: Application
metadata:
  name: acs-operator
  namespace: openshift-gitops
spec:
  destination:
    namespace: openshift-gitops
    server: https://kubernetes.default.svc
  project: default
  source:
    path: apps/acs
    repoURL: https://github.com/rcarrata/acs-gitops
    targetRevision: develop
  syncPolicy:
    automated:
      prune: true
      selfHeal: true
    syncOptions:
    - CreateNamespace=true
    - PruneLast=true
EOF
- As you can check in some of the k8s manifests of this ArgoApp that we’ve used to deploy StackRox, we’ve used ArgoCD Syncwaves to orchestrate the steps of the installation:
- After the Argo App is fully synched and finished properly, check the StackRox / ACS route:
ACS_ROUTE=$(k get route -n StackRox central -o jsonpath='{.spec.host}')
curl -Ik https://${ACS_ROUTE}
NOTE: Check that you’re getting a 200.
- Furthermore you can check that your cluster is secured and managed by StackRox / RHACS within the ${ACS_ROUTE}/main/clusters:
5.1 Generate Roxctl API Token within StackRox
Now, that we have our StackRox cluster up && running, securing our cluster of Kubernetes / OpenShift, let’s integrate the StackRox cluster with their CLI, roxctl.
This is needed because we will use roxctl cli within the Tekton Pipelines image-check tasks, with the StackRox / RHACS central API.
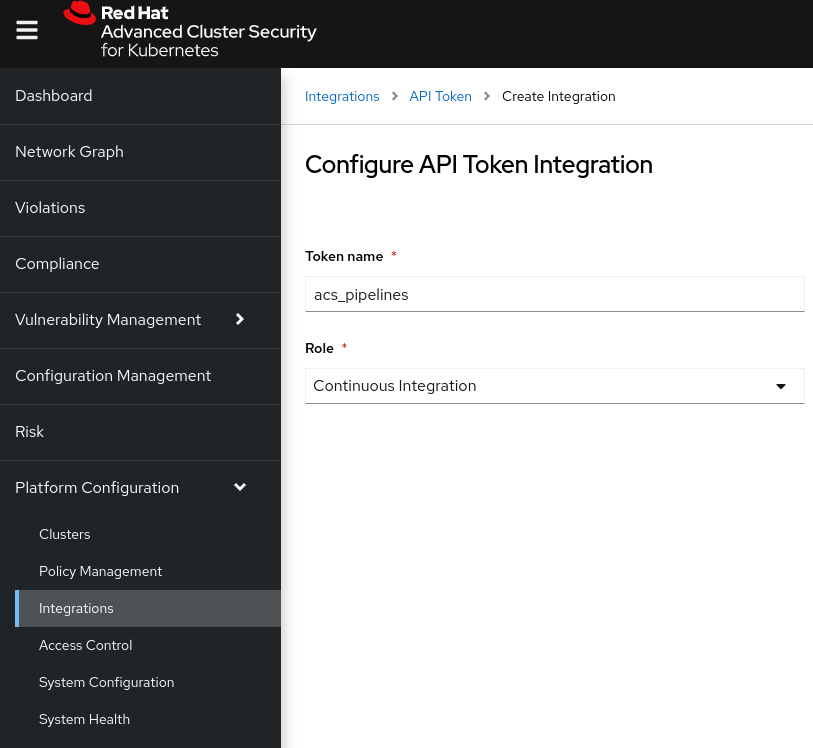
For this reason, we need to generate an API Token to authenticate and authorize the roxctl cli against the API of StackRox Central cluster.
- Generate an API Token within StackRox, go to Platform Configuration -> Integrations -> Authentication Tokens -> API Token and generate new API Token:
- Grab the token generated, and export into the ROX_API_TOKEN variable:
export ROX_API_TOKEN="xxx"
- Install the roxctl cli and use the roxctl check image to verify if the API Token is working properly:
roxctl --insecure-skip-tls-verify image check --endpoint $ACS_ROUTE:443 --image quay.io/centos7/httpd-24-centos7:centos7
The output of the command will show that two policies are violated, so the roxctl image check is working as expected:
WARN:   A total of 2 policies have been violated
ERROR:  failed policies found: 1 policies violated that are failing the check
ERROR:  Policy "Fixable Severity at least Important" - Possible remediation: "Use your package manager to update to a fixed version in future builds or speak with your security team to mitigate the vulnerabilities."
ERROR:  checking image failed after 3 retries: failed policies found: 1 policies violated that are failing the check
NOTE: For further information around this check the ACS Integration with CI Systems guide.
5.2 Integrate Tekton Pipeline with StackRox/ACS using API Token Secrets
Now that we have installed StackRox / ACS and we generated the StackRox/ACS API Token, it’s time to integrate StackRox/ACS with our Tekton Pipelines.
To do this, we need to generate a Secret that will contain the StackRox API Token credentials, that will be used by the Tekton Pipelines Tasks.
Let’s start!
- As we discussed before, to be able to authenticate from the Tekton Pipelines towards the StackRox / ACS API, the roxctl Task used in the pipelines, needs to have both ROX_API_TOKEN (generated in one step before) and the ACS Route as well inside a K8s Secret:
echo $ROX_API_TOKEN
echo $ACS_ROUTE

cat > /tmp/roxsecret.yaml << EOF
apiVersion: v1
data:
  rox_api_token: "$(echo $ROX_API_TOKEN | tr -d '\n' | base64 -w 0)"
  rox_central_endpoint: "$(echo $ACS_ROUTE:443 | tr -d '\n' | base64 -w 0)"
kind: Secret
metadata:
  name: roxsecrets
  namespace: ${NAMESPACE}
type: Opaque
EOF

kubectl apply -f /tmp/roxsecret.yaml
Now we have a K8s secret that will be used for the Tekton Tasks that will use roxctl and the ROXCTL API Token / ACS Route to connect to the StackRox API.
5.3 Integrate Quay Registry within StackRox / ACS
One last step in ACS/StackRox section, is to add the Quay registry credentials.
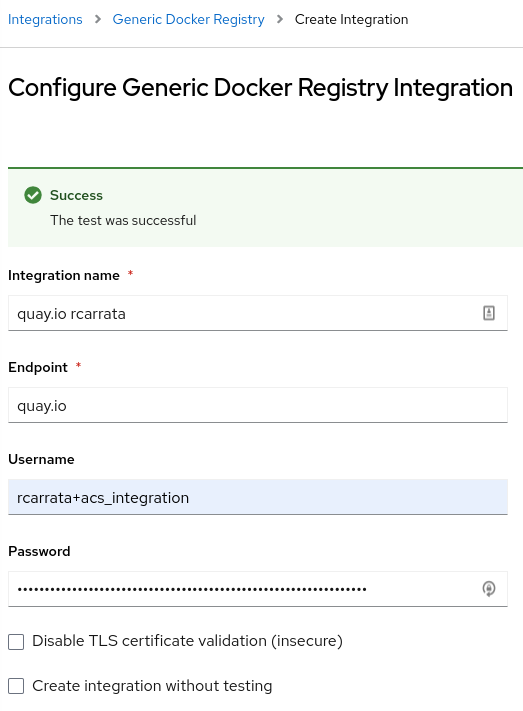
Go to Integrations and add a new Generic Docker Registry, adding the quay.io endpoint and the Quay Robot Account credentials generated earlier:
Click Test, and Save the integration within StackRox / ACS.
This will allow roxctl and ACS to analyze the images uploaded into the Quay Registry and grab the vulnerability scans analyzed and produced from Clair integrated within Quay.io.
6. Cosign and StackRox / ACS
Now that we have in place and integrated Tekton Pipelines / Tasks, ArgoCD and StackRox / ACS, it’s time to generate and integrate our Cosign/Sigstore signatures!
6.1 Generating KeyPair with Cosign
To sign content using cosign, a public/private keypair must be generated. Cosign can use keys stored in Kubernetes Secrets to so sign and verify signatures.
In order to generate a secret you have to pass the cosign generate-key-pair command a k8s://[NAMESPACE]/[NAME] URI specifying the namespace and secret name:
cosign generate-key-pair k8s://${NAMESPACE}/cosign
After generating the key pair, cosign will store it in a Kubernetes secret using your current context. The secret will contain the private and public keys, as well as the password to decrypt the private key.
kubectl get secret -n $NAMESPACE cosign -o yaml
apiVersion: v1
data:
  cosign.key: xxxx
  cosign.password: xxxx
  cosign.pub: xxxx
immutable: true
kind: Secret
The cosign command above prompts the user to enter the password for the private key. The user can either manually enter the password, or set an environment variable COSIGN_PASSWORD.
When verifying an image signature, using cosign verify, the key will be automatically decrypted using the password stored in the Kubernetes secret under cosign.password.
In the same folder that the cosign generate-key-pair is executed, a cosign.pub is generated as well (the public key of the cosign key-pair). Also the same is available in the cosign secret in our ${NAMESPACE} generated before as you can check.
6.2 Add Signature Integration within StackRox / ACS
Add the Cosign signature into the StackRox / ACS console using Integrations submenu. Go to Integrations, Signature, New Integration and add the following:
Integration Name - Cosign-signature
Cosign Public Name - cosign-pubkey
Cosign Key Value - Content of cosign.pub generated before
This will make available the cosign public signature generated in the step before, and that will enable ACS/StackRox to check through the System Policies, the verification check of the images that we will produce / deploy in our K8s / OCP cluster.
6.3 Add StackRox/ACS Policy Image Signature Verification
Now that we have the cosign public key present in the StackRox / ACS cluster, we need to generate a System Policy that verifies the Image Signature of the container images that we will build within our Tekton Pipelines and/or deploy in our ${NAMESPACE} inside of our K8s cluster.
- Copy and paste the content of the ACS Policy pre-generated (or upload the json file):
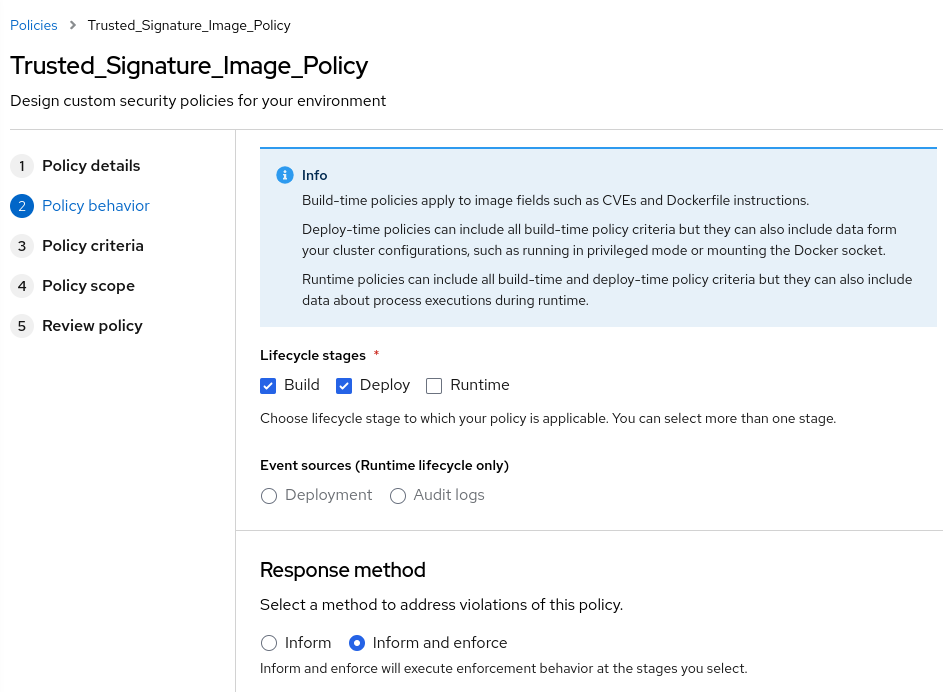
- After it’s imported, check the policy generated and select the response method as Inform and Enforce:
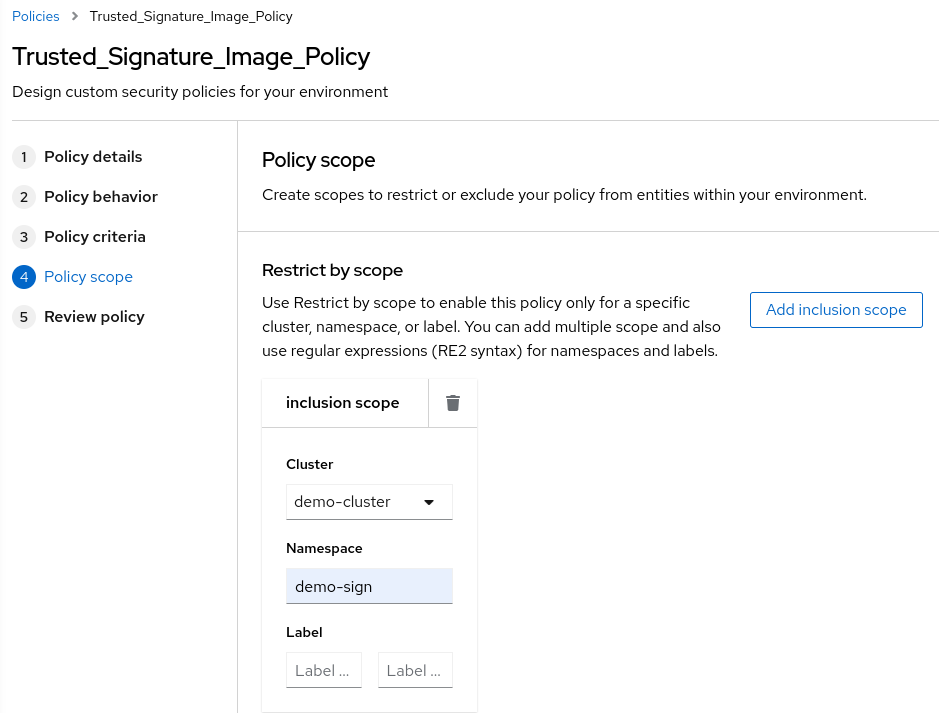
- In the policy scope restrict the Policy Scope of the Policy to the specific cluster and namespace (in my case demo-sign) and save the policy:
- Check with the roxctl image check command the new image against the cosign public key generated:
roxctl --insecure-skip-tls-verify image check --endpoint $ACS_ROUTE:443 --image  quay.io/centos7/httpd-24-centos7:centos7 | grep -A2 Trusted

| Trusted_Signature_Image_Policy |   HIGH   |      -       | Alert on Images that have not  |      - Image signature is      | All images should be signed by |
|                                |          |              |          been signed           |           unverified           |   our cosign-demo signature    |
+--------------------------------+----------+--------------+--------------------------------+--------------------------------+--------------------------------+
With this, the new policy is ready and generates alerts in the StackRox / ACS cluster, checking that the Container Image checked is not signed with the Cosign public key that we defined before.
NOTE: For more information around this check the StackRox / ACS official guide around signature verification.
7. Running Tekton Pipelines with Image Signature Verification
We’re ready to run our first Tekton Pipeline that will include Image Signature Verification from ACS/StackRox!
- Run the pipeline for build the image, push to the Quay registry, sign the image with cosign, push the signature of the image to the Quay registry:
kubectl create -f run/sign-images-pipelinerun.yaml
- The steps within the Tekton Pipeline will be as depicted below:
- Clone Repository
- Build Container Image and Push to Quay
- Sign the Container Image generated with the Cosign Private Key and push the signature to Quay
- Deploy the k8s deployment for the application
- Update the k8s deployment for the application with the signed image tag
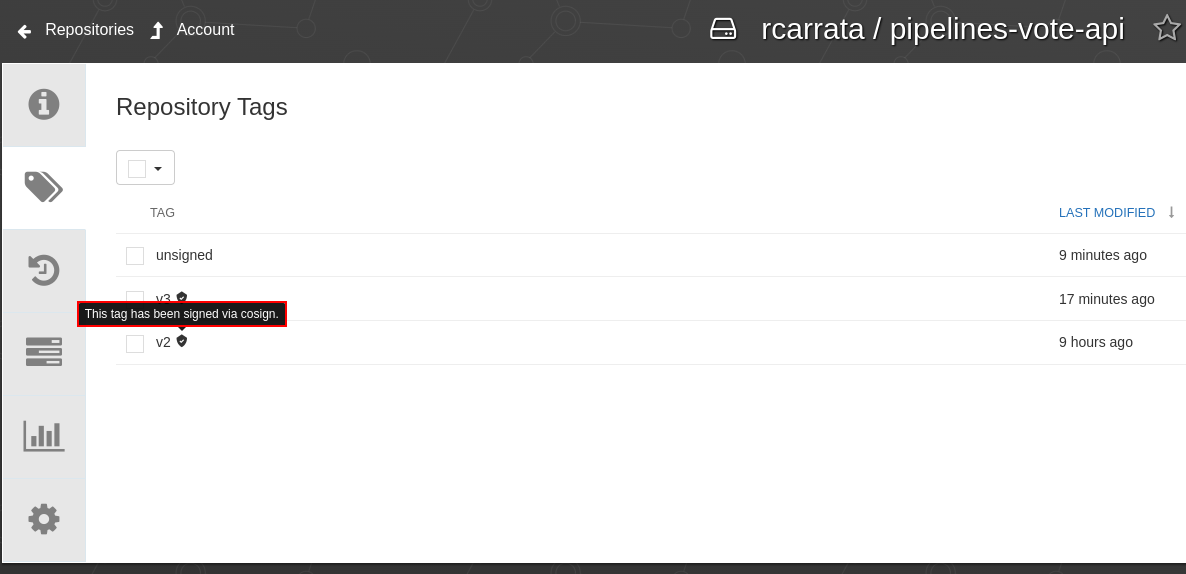
- Check in Quay that effectively the Container Image (with v2 tag) pushed is signed properly as you can check in the picture:
as we can check the message in the pic says: “This Tag has been signed via cosign”. So our pipeline generated the Container Image, signed with Cosign and pushed both, the Image and the Signature to the Quay registry.
- This Tekton Pipeline will deploy the signed image and also will be validated against StackRox/ACS Trusted Image Verification system policy:
kubectl get deploy -n workshop pipelines-vote-api
NAME                 READY   UP-TO-DATE   AVAILABLE   AGE
pipelines-vote-api   1/1     1            1           29h
It works!
8. Trying to hack our Tekton Pipeline with unsigned Container Images
Let’s try to Hack our pipeline!
For this, let’s think that some rogue user / hacker gained intel about where is the source code, introducing some CVEs that he can exploit to gain access to our systems.
If we have not implemented a proper Sign and Verify steps in our pipelines and within our K8s / OCP clusters for our container images, the Hacker can generate a rogue container image using the modified source code (or using a rogue Dockerfile/Containerfile) with some backdoor simulating that is our legit application, with the exact same name as is deployed, introducing risks that can be fatal for our supply chain security.
How to fix this?
Let’s see the power of Signing and Verifying container images using StackRox / ACS and Sigstore!
- Run the pipeline for build the image and push to the Quay registry, but this time without sign with cosign private key:
kubectl create -f run/unsigned-images-pipelinerun.yaml
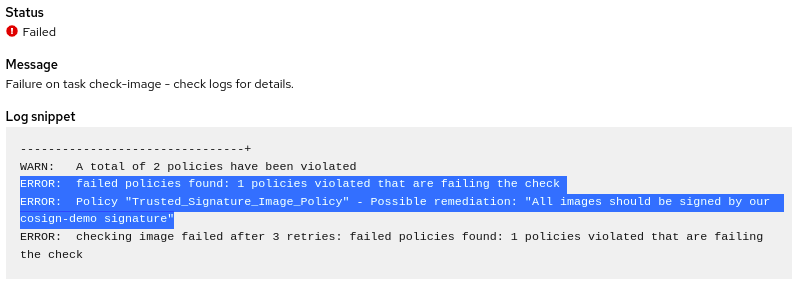
- The pipeline will fail because ACS/StackRox through the roxtctl image check task will detect that an unsigned image is built during the process and will be used for the app k8s deployment:
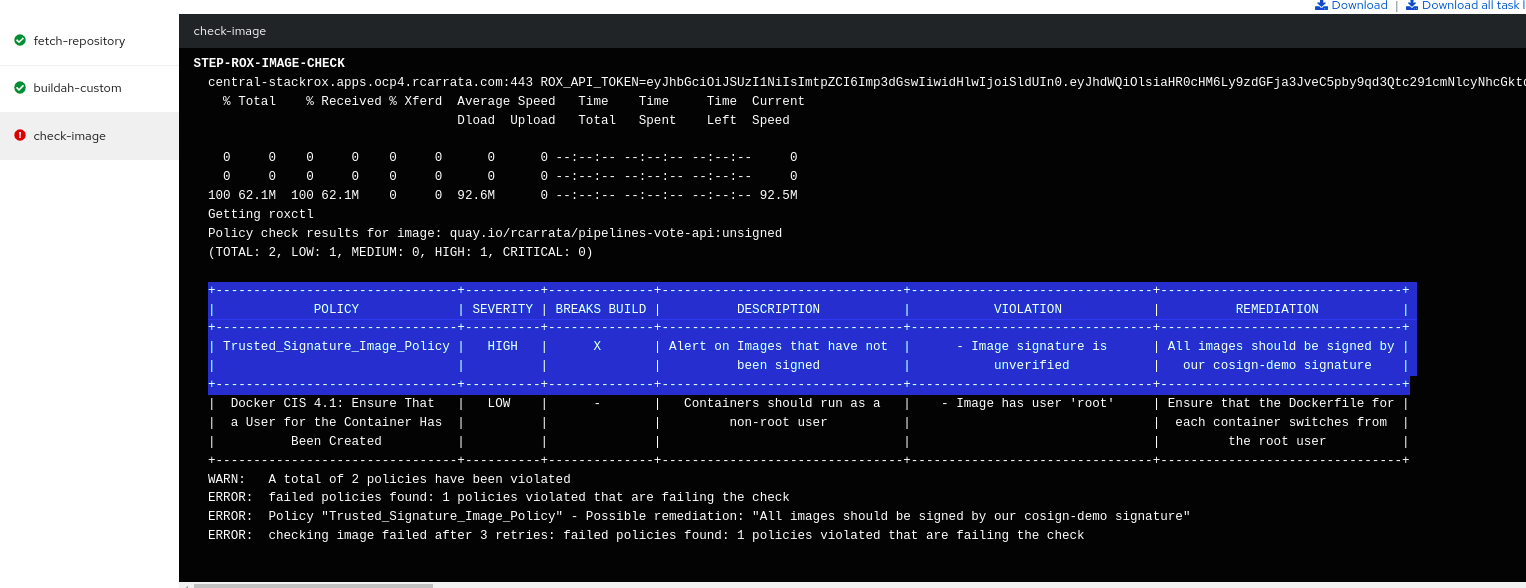
- As we can see in the logs, the step of check-image failed, because StackRox / ACS policy blocked the pipeline due to a policy failure (enforced by the Trusted Signature Image Policy).
- As you can check in the pipeline we have the full output of the image check with the rationale of the policy violation:
StackRox / ACS saved the day, blocking the pipeline that tried to hack our CICD / container supply chain!
8.1 Checking the Violations in StackRox / ACS
Let’s finally check the violations detected by ACS, related to the Container Image Verification system policies.
- If we go to the StackRox / ACS console, in the Violations dashboard we can check a Violation related with our Tekton Pipeline that generates a Container Image that was not properly signed in our cluster:
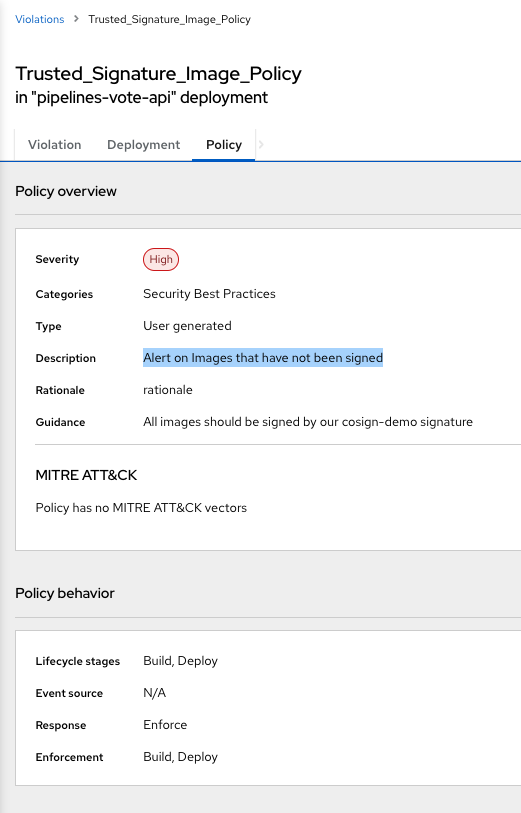
- Digging a bit deeper we can verify that the Policy that blocked our Tekton Pipeline and failed our CICD process was the Trusted Signature Image Policy:
because all the images in the namespace that are built needs to be signed by our Cosign private key, and had the signature pushed to Quay registry (in this case we’re using Quay, but we could use other registries as well).
And with that ends the third blog post around Securing the software supply chain with Sigstore and StackRox and ACS.
NOTE: Opinions expressed in this blog are my own and do not necessarily reflect that of the company I work for.
Happy hacking (and securing :D)!


