Scaling your Azure Private OpenShift clusters with Virtual Network NAT
How can we generate Private clusters OpenShift in Azure, controlling our Outbound traffic with scalable, managed Virtual NAT Gateway? What are the benefits of Azure Virtual NAT Gateways? And finally how can we configure our Azure Networking to use and benefit from the Virtual NAT?
This is the third blog post of the series of OpenShift deployments in Azure. Check the other blog posts in:
- First blog series in Deep dive in Private OpenShift 4 clusters deployments in Azure.
- Second blog series in Secure your Private OpenShift clusters with Azure Firewall and Hub-Spoke architectures
Let’s dig in!
NOTE: this blog post series is not an ARO implementation, is a regular OpenShift in Azure (non-ARO).
1. Overview
As we checked in the previous blog post, we have several options to deploy our Private OpenShift clusters, depending of their Outbound / User-Defined Routing modes that we want to use.
We analyzed a couple of this User Defined Routing (UDR), including the usage of Azure Load Balancers (default), usage of a Proxy Configuration and finally how to secure Private OpenShift clusters with Azure Firewall and Hub-Spoke Architectures.
Now we’re describing and analyzing the last but not least option that we have: installing OpenShift Private Clusters with Virtual NAT (Network Address Translation), providing outbound internet access for the subnets (and therefore VMs) of our clusters.
Again with this UDR mode (as we checked with Proxy and Azure Firewall), we can create Azure OpenShift Private clusters with no public endpoints.
NOTE: This is valid for every OpenShift on Azure installations (NO ARO), from ocp version 4.6+ onwards.
2. Azure Virtual NAT (Network Address Translation) Gateway
Before starting the deep dive into the OpenShift private clusters with Virtual NAT, let’s explore what is a Virtual NAT Gateway in Azure.
VNet NAT Gateway is a fully managed and highly resilient Network Address Translation (NAT) service. Virtual Network NAT simplifies outbound Internet connectivity for virtual networks. When configured on a subnet, all outbound connectivity uses the Virtual Network NAT’s static public IP addresses.
NAT gateway provides outbound internet connectivity for one or more subnets of a virtual network. Once a NAT gateway is associated to a subnet, NAT provides source network address translation (SNAT) for that subnet. NAT gateway specifies which static IP addresses virtual machines use when creating outbound flows.
2.1 Benefits of Azure Virtual NAT Gateway
Offers a lot of benefits and features, but for our case with Private OpenShift clusters in Azure, there are some of them that are very interesting such as:
- Security: with a NAT gateway, our VMs and other resources that are part of our Private OpenShift clusters doesn’t have public IP addresses and can remain fully private.
- Resiliency: Because Virtual NAT is a fully managed and distributed system, and because it always has multiple fault domains makes this service highly resilient.
- Scalability: One of the most important benefits it’s that the Virtual Network NAT is scaled out from creation, Azure manages itself the operator of the Virtual NAT by itself, scaling up to 16 IP addresses to NAT Gateway.
- Performance: because it’s based in a SDN service, NAT GW won’t affect the network bandwidth of the compute resources.
2.2 Outbound Connectivity for NAT Gateway
In the standard OpenShift in Azure deployment, the frontend IPs of a public load balancer can be used to provide outbound connectivity to the internet for backend instances. This configuration uses source network address translation (SNAT) to translate virtual machine’s private IP into the load balancer’s public IP address. SNAT maps the IP address of the backend to the public IP address of your load balancer. SNAT prevents outside sources from having a direct address to the backend instances.
One of the reasons that we can ask is, why don’t we stick with the Azure Load Balancer for the Outbound traffic to the internet from our Azure vNets and Subnets?
Virtual Network NAT (NAT Gateway) is the recommended method for outbound connectivity. NAT gateway doesn’t have the same limitations of SNAT port exhaustion as does default outbound access and outbound rules of a load balancer.
So what Azure says about the SNAT port exhaustion?
If you’re using a public standard load balancer and experience SNAT exhaustion or connection failures, ensure you’re using outbound rules with manual port allocation. Otherwise, you’re likely relying on load balancer’s default outbound access. Default outbound access automatically allocates a conservative number of ports, which is based on the number of instances in your backend pool. Default outbound access isn’t a recommended method for enabling outbound connections. When your backend pool scales, your connections may be impacted if ports need to be reallocated.
So if when you’re growing your OpenShift cluster in Azure (adding more Workers), your backend pool scales as well, and you can be impacted by the SNAT exhaustion impacting also your outbound connections if ports need to be reallocated.
Now that we know more about SNAT exhaustion and what are the benefits of the virtual NAT Gateways, let’s discover how we can use it alongside our OpenShift cluster.
3. Egress / Outbound Mode with NAT Gateway
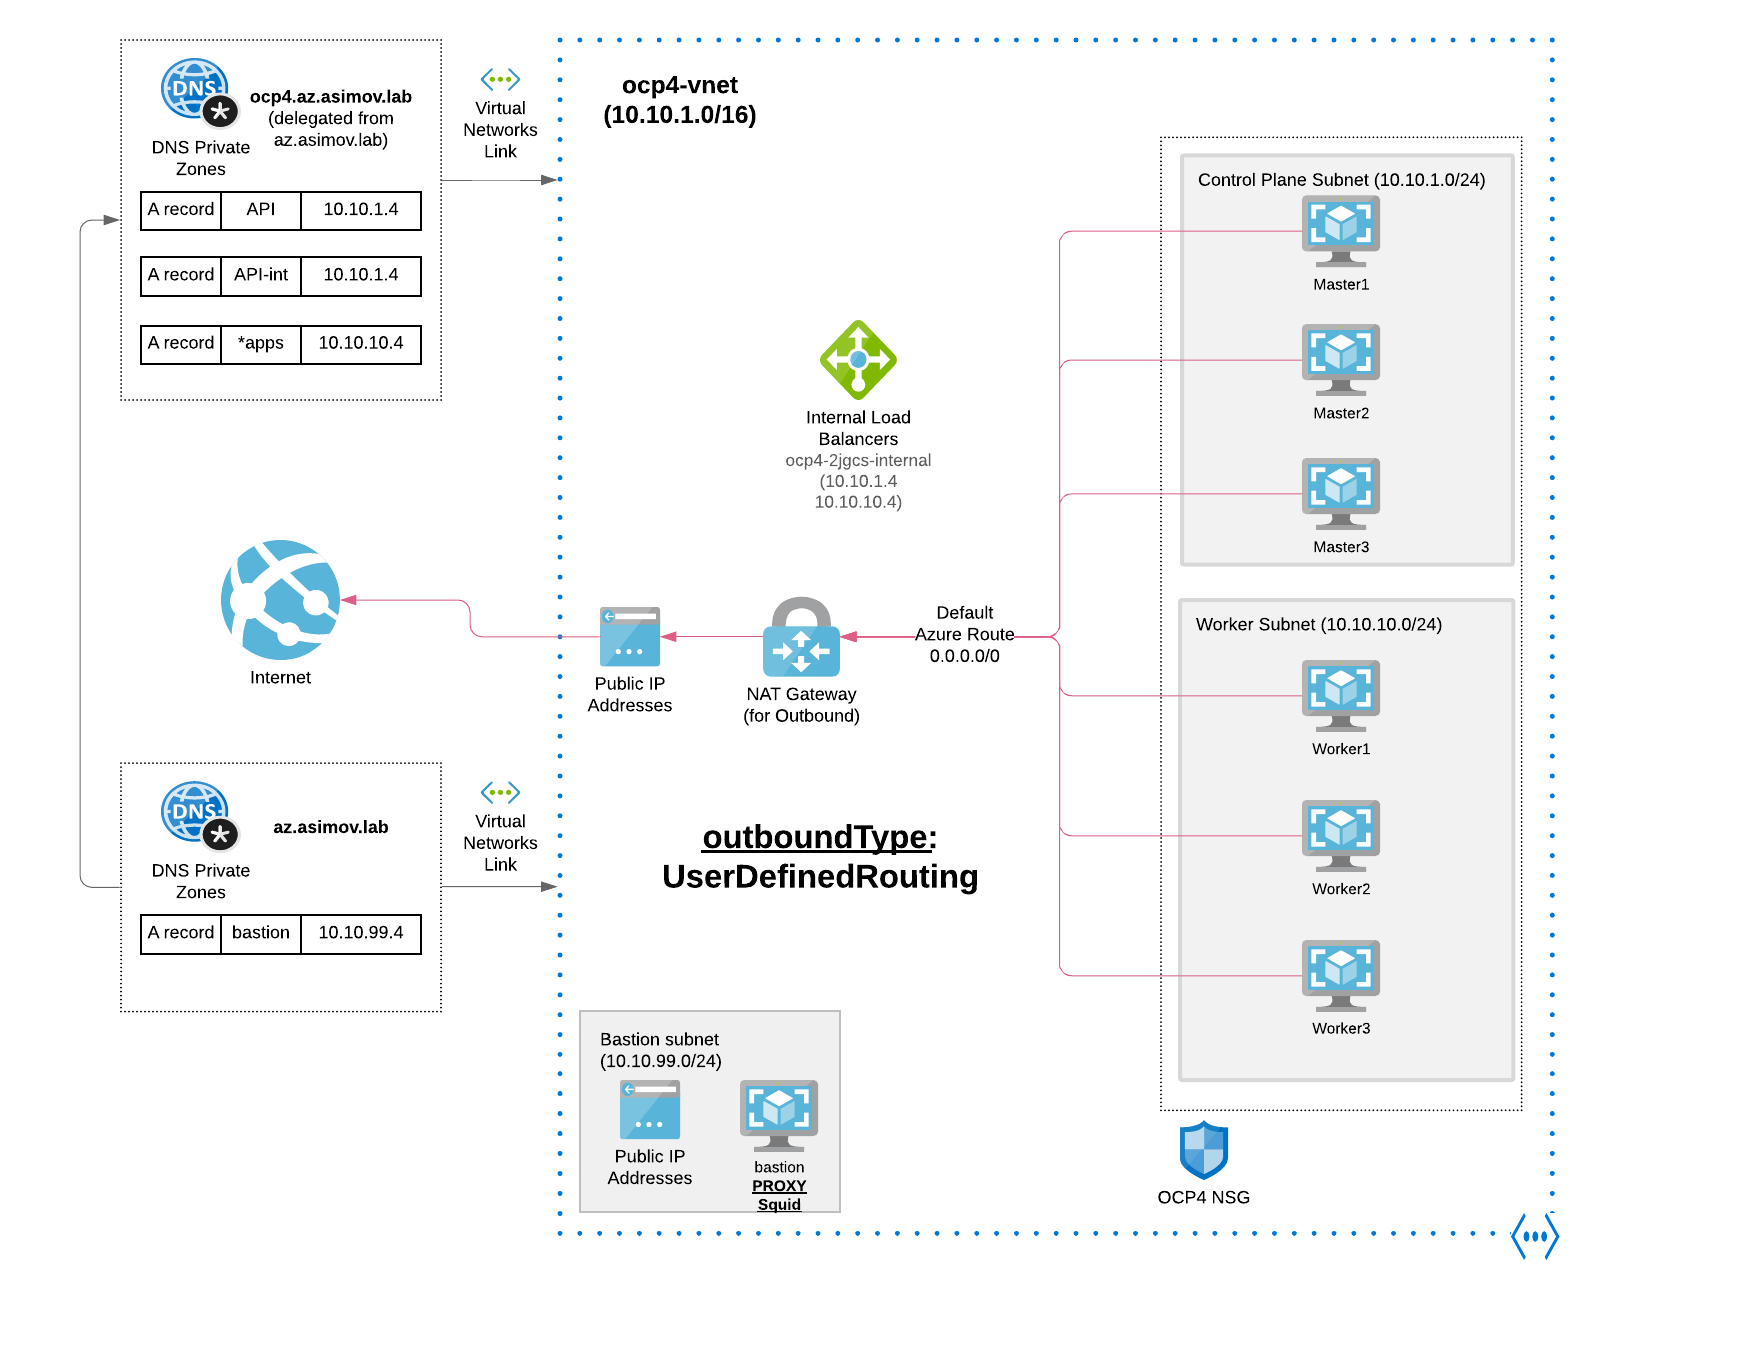
Let’s analyze the Private OpenShift clusters in Azure, using Azure VNET network address translation (NAT Gateway) to provide the outbound Internet routing for the subnets of the OCP cluster.
As we can see we have our VNet setup with an Azure NAT Gateway and the user-defined routing configured, and there are NOT any public endpoint / IPs.
One important thing about the Outbound Connectivity using NAT Gateway is that NAT gateway allows flows to be created from the virtual network to the services outside your virtual network. Return traffic from the internet is only allowed in response to an active flow. Services outside your virtual network can’t initiate an inbound connection through NAT gateway.
3.1 Configuring NAT Gateway to be used as default route for the outbound
In the implementation of Azure Firewall in OpenShift 4, we needed to configure the User Define Routes for force the traffic to go to the Hub and through the Firewall itself. So what is needed in this scenario?
Nothing! Azure NAT Gateway default configurations will help us!
-
NAT gateway takes precedence over other outbound scenarios (including Load balancer and instance-level public IP addresses) and replaces the default Internet destination of a subnet.
-
When NAT gateway is configured to a virtual network where standard Load balancer with outbound rules already exists, NAT gateway will take over all outbound traffic moving forward. There will be no drops in traffic flow for existing connections on Load balancer. All new connections will use NAT gateway.
So in a nutshell, all OpenShift Outbound requests are routed over Azure’s internal network, through the Azure NAT Gateway.
3.5 Automating deployment of the OpenShift cluster using Azure Firewall as Outbound traffic
Now that we defined and explained all the resources that we will have in the architecture, we need to deploy our architecture and then our OpenShift cluster within.
First we need to deploy the VPC and Subnets, then the Firewall and the Route Tables, and all that we explained before.
Then we need to deploy our bastion, and finally deploy our cluster of OpenShift using all the Azure resources that we needed as prerequisites.
Do we need to deploy all of this things, manually? No, let’s use Ansible for that!
- Clone the repository where the ocp4 azure ipi demo is stored:
git clone https://github.com/rcarrata/ocp4-azure-ipi.git
cd ocp4-azure-ipi
- Install Azure CLI:
sudo rpm --import https://packages.microsoft.com/keys/microsoft.asc

echo -e "[azure-cli]
name=Azure CLI
baseurl=https://packages.microsoft.com/yumrepos/azure-cli
enabled=1
gpgcheck=1
gpgkey=https://packages.microsoft.com/keys/microsoft.asc" | sudo tee /etc/yum.repos.d/azure-cli.repo

sudo dnf install azure-cli

az login
- Fill and create the Azure Creds for the Service Principal inherit by the Openshift Installer:
cat ~/.azure/osServicePrincipal.json
{"subscriptionId":"xxxx","clientId":"xxxx","clientSecret":"xxxx","tenantId":"xxxx"}
- Install Ansible and Azure Cli dependencies:
pip install virtualenv
virtualenv ansible-210
source ansible-210/bin/activate
pip install ansible==2.10
pip install selinux
ansible-galaxy collection install azure.azcollection
pip install -r ~/.ansible/collections/ansible_collections/azure/azcollection/requirements-azure.txt
- Add the vault directory and the vault yaml and generate a Vault-File with the credentials of Azure and OCP4 PullSecret:
ansible-vault edit vault/azure.yml
- Fill inside the vault.yml with:
azure_subscription_id: SECRET
azure_client_id: SECRET
azure_secret: SECRET
azure_tenant: SECRET
ocp4_pull_secret: '<<< pull_secret_azure >>>'
-
For obtain the pull_secret go to OCP4 Install
-
Generate the .vault-password-file and put the password:
touch .vault-password-file
echo "yourpasswordfancy" >> .vault-password-file
- Install Openshift with Azure Firewall as the Egress Outbound:
ansible-playbook install-private.yml -e "egress=natgateway" -e "azure_outboundtype=UserDefinedRouting" --vault-password-file .vault-file-password
4. Connecting to our private cluster from the Internet
Now that we have deployed the cluster, how can we access the console that it’s not exposed publicly?
As we discussed in the previous blog post, there are several options, like having a VPN Gateway, an Express Route or even deploying a VM and using Azure Bastion to connect from there to the Bastion.
But there is a very simple, cost-effective way to do that, use the Bastion to enable a Proxy Socks5 ssh connection.
A SOCKS proxy is an SSH encrypted tunnel in which configured applications forward their traffic down, and then, on the server-end, the proxy forwards the traffic to the general Internet.
Unlike a VPN, a SOCKS proxy has to be configured on an app-by-app basis on the client machine, but we can set up apps without any specialty client software as long as the app is capable of using a SOCKS proxy. On the server-side, all you need to configure is SSH.
Let’s do try it!
- Connect to the bastion using the private key generated
ssh -i vault/ssh-key  -D 9000 az-admin@xx.xx.xx.xx
Activate the web console with: systemctl enable --now cockpit.socket
[az-admin@bastion ~]$ sudo -i
- And then connect using the Proxy Socks with the DNS option enabled. An example with Firefox is:
as you can check the SOCKSv5 needs to be enabled, we used the port 9000.
And then the most important check is the “Proxy DNS when using SOCKSv5” option. This option will redirect and resolve all the requests from our browser through the Proxy socks SSH tunnel, reaching the Azure DNS private records, and then resolving our OpenShift Console.
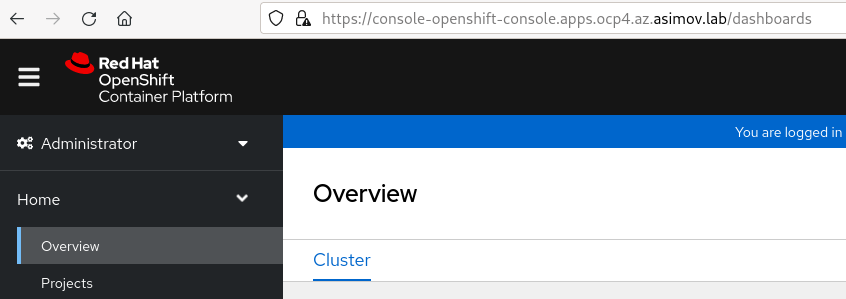
- Now if we use our regular ocp console url in our browser, we will see the OpenShift console without needing to set an expensive VPN or ExpressRoute.
But remember that it’s only for testing purposes, once the ssh connection is closed, or if the VM suffers any issue, this method is also unavailable.
So with that we finished the second part of this blog around “Secure your Private OpenShift clusters with Azure Firewall and Hub-Spoke architectures”.
NOTE: Opinions expressed in this blog are my own and do not necessarily reflect that of the company I work for.
Happy OpenShifting!


