Zero Trust Networks and mTLS Deep Dive in OpenShift Service Mesh
How we can ensure that our traffic between our microservices it’s encrypted and safe in a Zero Trust Network? How we can enable in an easy way mTLS between in our Service Mesh cluster? And how you can check how to manage the different CRs and Istio objects for achieve secure microservices deployments?
Let’s Mesh in!
This is the eighth blog post of the Service Mesh in OpenShift series. Check the earlier posts in:
- I - Service Mesh Installation
- II - Microservices deployment in Service Mesh
- III - Including microservices in Service Mesh
- IV - Ingress Routing & Traffic Management in Service Mesh
- V - Blue Green Deployments in Service Mesh
- VI - Canary Deployments in Service Mesh
- VII - Traffic Mirroring in Service Mesh
A. Overview
Mutual authentication or two-way authentication refers to two parties authenticating each other at the same time, being a default mode of authentication in some protocols (IKE, SSH) and optional in others (TLS).
With Red Hat OpenShift Service Mesh, Mutual TLS can be used without either application/service knowing that it is happening. The TLS is handled entirely by the service mesh infrastructure and between the two sidecar proxies.
The mTLS Istio feature could be enable at the cluster level, or at namespace level. We will enable at the namespace level, demoing the Istio objects that controls mTLS security.
All the tests in this mtls deep dive blog post are executed in:
- OpenShift 4.7
- Service Mesh Operator 2.0.8
- Jaeger 1.24.1
- Elasticsearch 5.2.2
- Kiali 1.24.0
NOTE: this blog post is supported by the istio-files repository located in my personal Github.
B. Install Service Mesh Control Operators and the ControlPlane
We will start this blog post from an OpenShift “empty” (fresh installed) because we will install the Service Mesh v2 based in Istio 1.6, that differs a bit from the earlier version of the Service Mesh v1 used in the previous labs.
- Install the service mesh operators
helm install service-mesh-operators -n openshift-operators service-mesh-operators/
- Check the Service Mesh Operators status with the helm ls:
helm ls -n openshift-operators
- Check also the status of the OpenShift operator pods.
kubectl get pod -n openshift-operators
- Then, install the Service Mesh control plane:
export deploy_namespace=istio-system

kubectl new-project ${deploy_namespace}

#Note: you may need to wait a moment for the operators to propagate

helm install control-plane -n ${deploy_namespace} control-plane/
- Monitor the Service Mesh Control Plane
kubectl get pod -n istio-system
NAME                                    READY   STATUS              RESTARTS   AGE
grafana-58b8d6b866-vkzfz                2/2     Running             0          59s
istio-egressgateway-74688d758-n9kcw     1/1     Running             0          59s
istio-ingressgateway-566b8799f5-tvmtv   1/1     Running             0          59s
istiod-basic-install-7fd5988b8d-7h2s6   1/1     Running             0          116s
jaeger-5bb5848ff5-vg927                 2/2     Running             0          59s
kiali-75d59c6544-2r5qp                  0/1     ContainerCreating   0          11s
prometheus-854f88478f-mqlq4             3/3     Running             0          88s
B.1. Analyse the ServiceMeshControlPlane object deployed
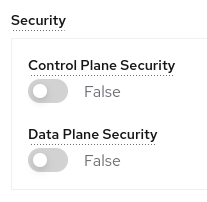
The ServiceMeshControlPlane is a Service Mesh CR that controls the setup and the components of each Service Mesh Control Plane. In our case, we will disable the mtls, automtls and controlPlane mtls in the security section, because we will adjust manually this components, without the interference of the Service Mesh Operator:
apiVersion: maistra.io/v2
kind: ServiceMeshControlPlane
metadata:
  name:
  namespace:
spec:
...
  security:
    dataPlane:
      mtls: false
      automtls: false
    controlPlane:
      mtls: false
Check the full Service Mesh Control Plane CR object that it’s used in this deep dive blog post for more information.
As we discussed previously, in the deployment of the lab, we disabled the mtls and the automtls at the ServiceMeshControlPlane, because we want to control everything at the namespace level (and force the mTLS to be disabled in the next steps):
At the ServiceMeshControlPlane in the yaml cluster we can see the specific CR for the security part of the Mesh Control Plane:
kubectl get smcp -n istio-system basic-install -o jsonpath='{.spec.security}' | jq .
{
  "controlPlane": {
    "mtls": false
  },
  "dataPlane": {
    "automtls": false,
    "mtls": false
  }
}
NOTE: A PeerAuthentication by default it’s generated in the Istio Control Plane namespace (istio-system in our case).
With this you can have the full control of the PeerAuthentications and the Destination Rules generated in the cluster, but on the other hand are not automated by the ServiceMeshControlPlane and Service Mesh Operators and you need to provide them in each case.
IMPORTANT: In production (or in non demo/poc systems), it’s HIGHLY recommended to enable mtls, automtls in both dataPlane and controlPlane and control the PeerAuthentication at the namespace level, the previous setup it’s only for a PoC / Demo!!
Now that we have our Service Mesh control plane installed, let’s have some fun!
C. Deploy mTLS in Permissive Mode
C.1. Deploy Service Mesh mTLS for specific App (namespace level)
As we described before we can enable the mtls at the namespace level as the Service Mesh documentation specifies.
Let’s deploy the Istio objects that are required for enable the mTLS at the namespace level. We will use the well known bookinfo app in this blog post.
- Export first some handy variables used during the blog post:
export bookinfo_namespace=bookinfo
export control_plane_namespace=istio-system
export control_plane_name=basic-install
export control_plane_route_name=api
- Then we will install the Bookinfo app and all the istio objects needed for enable the mTLS deploying them though Helm v3:
DEPLOY_NAMESPACE=${bookinfo_namespace}
CONTROL_PLANE_NAMESPACE=${control_plane_namespace}
CONTROL_PLANE_NAME=${control_plane_name}
CONTROL_PLANE_ROUTE_NAME=${control_plane_route_name}

kubectl project ${DEPLOY_NAMESPACE}

helm upgrade -i basic-gw-config -n ${DEPLOY_NAMESPACE} \
  --set control_plane_namespace=${CONTROL_PLANE_NAMESPACE} \
  --set control_plane_name=${CONTROL_PLANE_NAME} \
  --set route_hostname=$(oc get route ${CONTROL_PLANE_ROUTE_NAME} -n ${CONTROL_PLANE_NAMESPACE} -o jsonpath={'.spec.host'}) \
  basic-gw-config -f basic-gw-config/values-mtls.yaml
- Check the PeerAuthentication object generated in the Bookinfo namespace:
kubectl get peerauthentications.security.istio.io default -o jsonpath='{.spec}' -n $bookinfo_namespace | jq .
{
  "mtls": {
    "mode": "PERMISSIVE"
  }
}
PeerAuthentication defines how traffic will be tunneled (or not) to the sidecar. In Mode PERMISSIVE the connection can be either plaintext or mTLS tunnel.
For more information check the Modes of PeerAuthentication.
C.2. Test the Bookinfo as a External User (outside the OCP Cluster)
Let’s test the app from outside the OCP cluster, simulating as we are a user of our application:
GATEWAY_URL=$(echo https://$(oc get route ${control_plane_route_name} -n ${control_plane_namespace} -o jsonpath={'.spec.host'})/productpage)

curl $GATEWAY_URL -Iv
The result must be 200 OK as the curl below depicts:
...
> HEAD /productpage HTTP/1.1
> Host: api-istio-system.apps.XXX.com
> User-Agent: curl/7.76.1
> Accept: */*
>
* TLSv1.3 (IN), TLS handshake, Newsession Ticket (4):
* TLSv1.3 (IN), TLS handshake, Newsession Ticket (4):
* old SSL session ID is stale, removing
* Mark bundle as not supporting multiuse
< HTTP/1.1 200 OK
HTTP/1.1 200 OK
< content-type: text/html; charset=utf-8
content-type: text/html; charset=utf-8
< content-length: 4183
content-length: 4183
< server: istio-envoy
server: istio-envoy
...
<
* Connection #0 to host api-istio-system.apps.XXXX.com left intact
C.3. Check Kiali service
- Let’s check the Kiali service:
echo https://$(oc get route -n $control_plane_namespace kiali -o jsonpath={'.spec.host'})
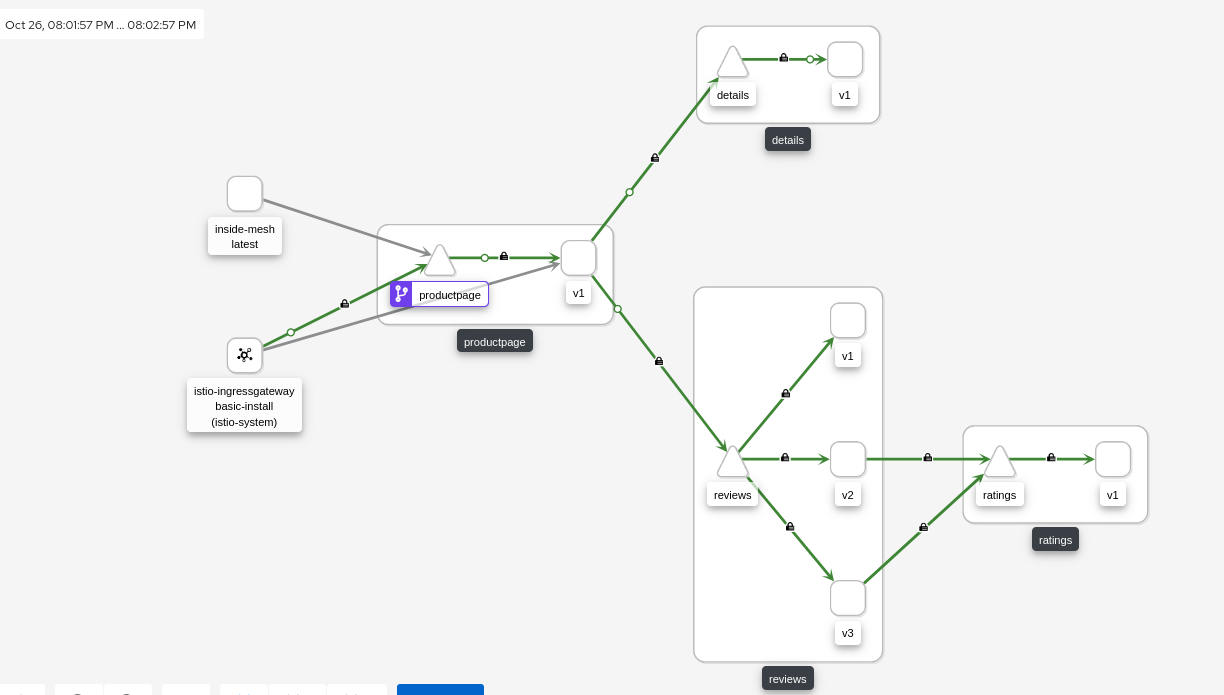
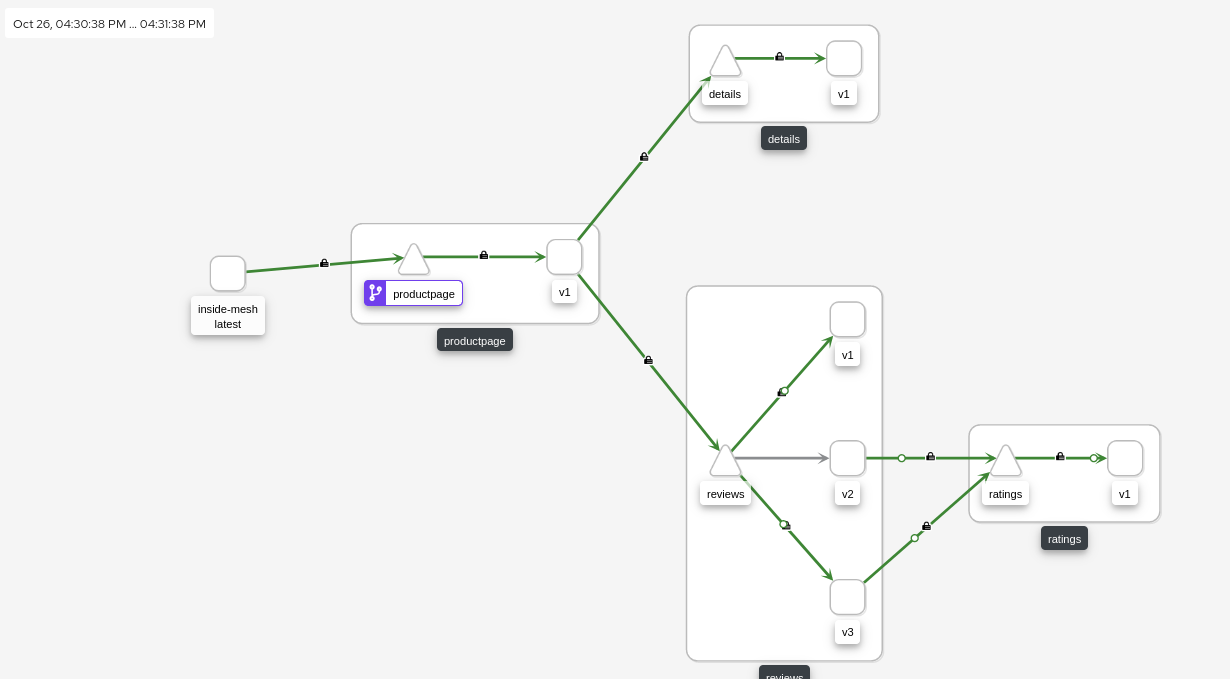
- In the Kiali we can see (with the mTLS Security flag enabled), that from the request goes thought the ingressGW and all the traffic between our microservices of our app is encrypted with mTLS:
C.4. Check the mTLS within/inside the Mesh
Let’s do a test inside our mesh application, simulating that the requests comes from another pod but INSIDE the mesh.
- Deploy a test application for execute the tests:
kubectl create deployment --image nginxinc/nginx-unprivileged inside-mesh -n $bookinfo_namespace
- Enable the autoinjection, patching the deployment of ou application adding an annotation the sidecar.istio.io/inject to true:
kubectl patch deploy/inside-mesh -p '{"spec":{"template":{"metadata":{"annotations":{"sidecar.istio.io/inject":"true"}}}}}' -n bookinfo
- Inside the pod execute several requests toward the ProductPage microservice:
kubectl exec -ti deploy/inside-mesh -- bash
$ for i in {1..10}; do curl -vI http://productpage:9080/productpage?u=normal && sleep 2; done
- All the requests must return HTTP 200 OK
If you noticed, the request does not come from the Ingress Gw, it’s coming from the Inside-Mesh pod. Cool, isn’t?
C.5. Check the mTLS outside the Mesh
Now it’s the turn to demonstrate that with the Mode PERMISSIVE, the traffic that’s allowed in our Mesh namespace can be in mTLS and also in Plain Text (HTTP).
- Let’s generate another deployment for execute the test but without injecting the Istio sidecar:
kubectl create deployment --image nginxinc/nginx-unprivileged outside-mesh -n $bookinfo_namespace
- In the the Outside Pod, execute the same request as before:
kubectl exec -ti deploy/outside-mesh -- bash
$ for i in {1..10}; do  curl -vI http://productpage:9080/productpage?u=normal && sleep 2; done
NOTE: All the requests must return HTTP 200 OK
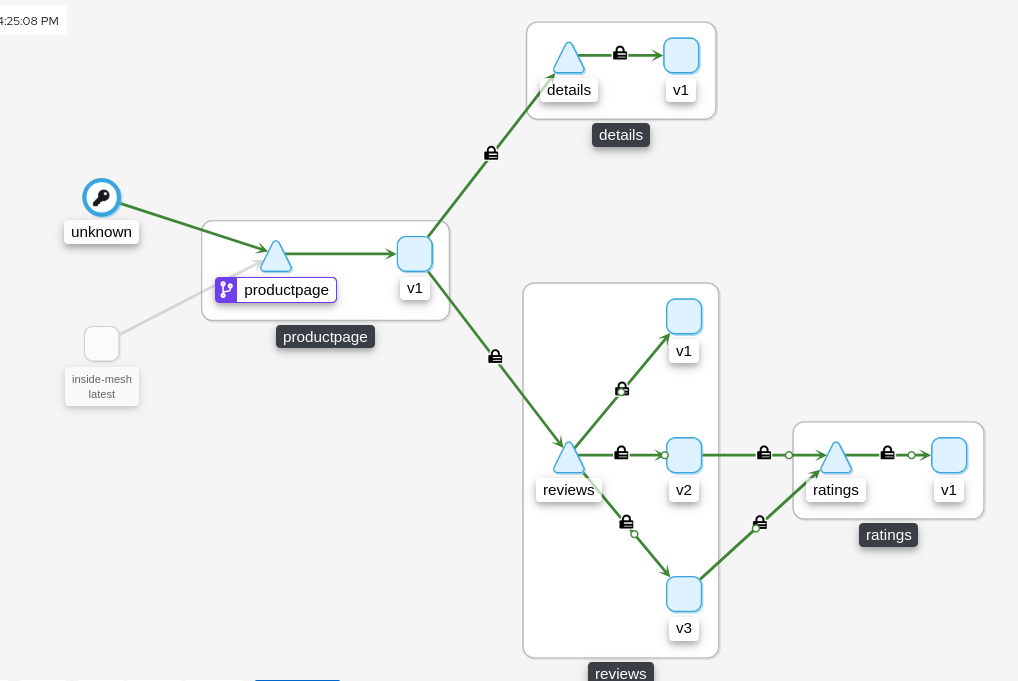
You will notice that there are requests originating from “unknown”. That is the pod inside which the curl command was executed.
C.6 Check the encryption between microservices with mTLS in Permissive mode
Now let’s check if our traffic it’s encrypted using the istioctl tools, with the flag of experimental authz check directly in one of the pods (we selected randomly the Details but works with the others).
- Let’s execute the experimental authz check with the pod id and grepping for virtual, for checking the status of the Envoy configuration in the Pod:
istioctl experimental authz check $(kubectl get pods -n bookinfo | grep details| head -1| awk '{print $1}') | grep virtual
Checked 13/25 listeners with node IP 10.131.1.100.
LISTENER[FilterChain]     CERTIFICATE          mTLS (MODE)          AuthZ (RULES)
...
virtualOutbound[0]        none                 no (none)            no (none)
virtualOutbound[1]        none                 no (none)            no (none)
virtualInbound[0]         none                 no (none)            no (none)
virtualInbound[1]         noneSDS: default     yes (none)           no (none)
virtualInbound[2]         none                 no (none)            no (none)
virtualInbound[3]         noneSDS: default     yes (none)           no (none)
virtualInbound[4]         none                 no (none)            no (none)
virtualInbound[5]         none                 no (none)            no (none)
virtualInbound[6]         noneSDS: default     yes (PERMISSIVE)     no (none)
virtualInbound[7]         none                 no (PERMISSIVE)      no (none)
virtualInbound[8]         noneSDS: default     yes (PERMISSIVE)     no (none)
virtualInbound[9]         none                 no (PERMISSIVE)      no (none)
0.0.0.0_15010             none                 no (none)            no (none)
0.0.0.0_15014             none                 no (none)            no (none)
Notice that mTLS is enabled in the virtual inbounds.
- To validate how traffic is sent through Istio proxies, we will be using the Ksniff utility.
POD_PRODUCTPAGE=$(oc get pod | grep productpage | awk '{print $1}')

DETAILS_IP=$(oc get pod -o wide | grep details | awk '{print $6}')
echo $DETAILS_IP
In the previous case the Details IP is 10.131.1.100.
- Then let’s sniff the traffic that is sent from the ProductPage pod to the Details v1 pod by running:
kubectl sniff -i eth0 -o ./mtls.pcap $POD_PRODUCTPAGE -f '((tcp) and (net 10.131.1.100))' -n bookinfo -p -c istio-proxy
INFO[0000] sniffing method: privileged pod
INFO[0000] sniffing on pod: 'productpage-v1-658849bb5-lfrh9' [namespace: 'bookinfo', container: 'istio-proxy', filter: '((tcp) and (net 10.131.1.100))', interface: 'eth0']
INFO[0000] creating privileged pod on node: 'xxxx'
INFO[0000] pod: 'ksniff-wn8t4' created successfully in namespace: 'bookinfo'
INFO[0000] waiting for pod successful startup
INFO[0007] pod: 'ksniff-wn8t4' created successfully on node: 'xxxxx'
INFO[0007] executing command: '[chroot /host crictl inspect --output json ac2bda75954daf1c4e4ab48c0ffdf7a59a36cb83cbbb9649d89deb420f572ab4]' on container: 'ksniff-privileged', pod: 'ksniff-wn8t4', namespace: 'bookinfo'
INFO[0008] command: '[chroot /host crictl inspect --output json ac2bda75954daf1c4e4ab48c0ffdf7a59a36cb83cbbb9649d89deb420f572ab4]' executing successfully exitCode: '0', stdErr :''
INFO[0008] output file option specified, storing output in: './mtls.pcap'
INFO[0008] starting remote sniffing using privileged pod
INFO[0008] executing command: '[nsenter -n -t 2430077 -- tcpdump -i eth0 -U -w - ((tcp) and (net 10.131.1.100))]' on container: 'ksniff-privileged', pod: 'ksniff-wn8t4', namespace: 'bookinfo'
- So now go to a new terminal window and execute:
curl $GATEWAY_URL -I
-
Then move to kubectl sniff terminal window and stop the process (Ctrl+C).
-
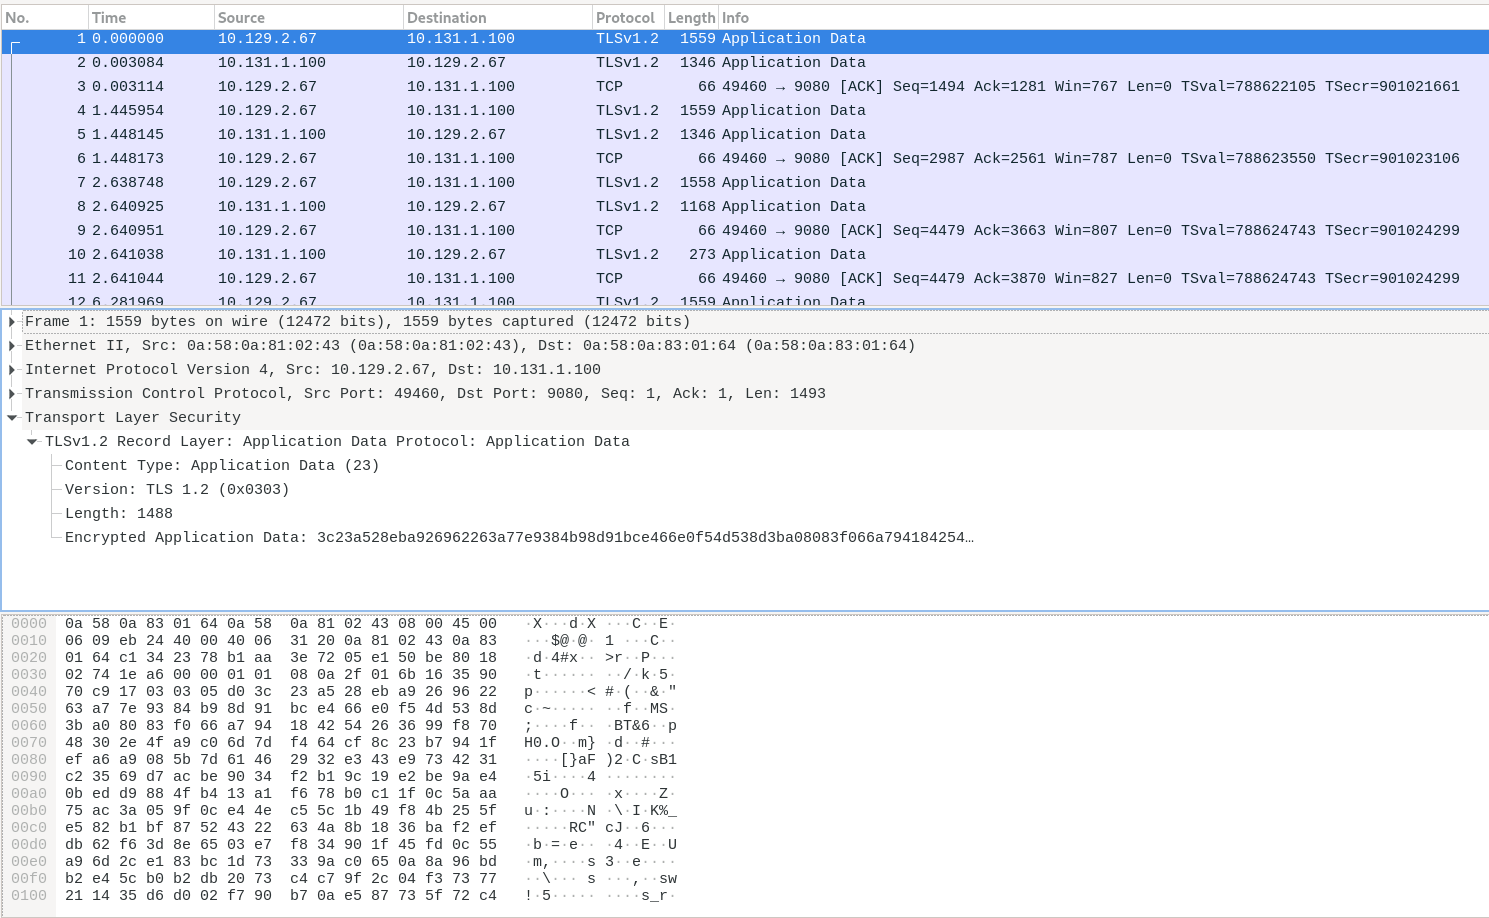
At the same directory, you have a file named mtls.pcap which is the captured traffic, you can use Wireshark to open the file, and you’ll see something like:
If you check the pcap file with Wireshark, all the traffic it’s encrypted with TLS1.x from and to all the microservices, because we enabled the mTLS feature in the PeerAuthentication object with the mode PERMISSIVE.
D. Deploy mTLS with mode DISABLE
Now, let’s see what happens when we turn off the mTLS at the namespace level. We can disable the mTLS using the mode: DISABLE at the PeerAuthentication level, and also applying at the DestinationRule level (this is not a strong requirement, but ensures that in all places the DISABLE mode it’s set).
- Let’s deploy the Istio objects for disable the mTLS in the bookinfo namespace:
helm upgrade -i basic-gw-config -n ${DEPLOY_NAMESPACE} \
  --set control_plane_namespace=${CONTROL_PLANE_NAMESPACE} \
  --set control_plane_name=${CONTROL_PLANE_NAME} \
  --set route_hostname=$(oc get route ${CONTROL_PLANE_ROUTE_NAME} -n ${CONTROL_PLANE_NAMESPACE} -o jsonpath={'.spec.host'}) \
  basic-gw-config -f basic-gw-config/values-mtls-disabled.yaml
- Check the PeerAuthentication to verify if it’s in mode DISABLE:
kubectl get peerauthentications.security.istio.io -n bookinfo default -o jsonpath='{.spec}' | jq .
{
  "mtls": {
    "mode": "DISABLE"
  }
}
- Check the DestinationRule to see if the tls it’s in mode DISABLE:
kubectl get dr {-n bookinfo bookinfo-mtls -o jsonpath='{.spec}' | jq .
  "host": "*",
  "trafficPolicy": {
    "tls": {
      "mode": "DISABLE"
    }
  }
}
- Now we’re going to check in one random pod if this is effectively also at the Envoy Istio pods in our Service Mesh cluster:
istioctl experimental authz check $(kubectl get pods -n bookinfo | grep details| head -1| awk '{
print $1}')
Checked 13/25 listeners with node IP 10.131.1.100.
LISTENER[FilterChain]     CERTIFICATE     mTLS (MODE)     AuthZ (RULES)
0.0.0.0_80                none            no (none)       no (none)
0.0.0.0_3000              none            no (none)       no (none)
0.0.0.0_5778              none            no (none)       no (none)
0.0.0.0_9080              none            no (none)       no (none)
0.0.0.0_9090              none            no (none)       no (none)
0.0.0.0_9411              none            no (none)       no (none)
0.0.0.0_14250             none            no (none)       no (none)
0.0.0.0_14267             none            no (none)       no (none)
0.0.0.0_14268             none            no (none)       no (none)
virtualOutbound[0]        none            no (none)       no (none)
virtualOutbound[1]        none            no (none)       no (none)
virtualInbound[0]         none            no (none)       no (none)
virtualInbound[1]         none            no (none)       no (none)
virtualInbound[2]         none            no (none)       no (none)
virtualInbound[3]         none            no (none)       no (none)
virtualInbound[4]         none            no (none)       no (none)
virtualInbound[5]         none            no (none)       no (none)
0.0.0.0_15010             none            no (none)       no (none)
0.0.0.0_15014             none            no (none)       no (none)
Notice that mTLS is not enabled in the virtual inbounds.
To validate how traffic is sent through Istio proxies in plain text, we will be using the Ksniff utility.
- Extract the Producpage pod ID and the Details IP (we will originate our check in the ProductPage pod, and check the traffic to the Details Pod IP):
POD_PRODUCTPAGE=$(oc get pod | grep productpage | awk '{print $1}')

DETAILS_IP=$(oc get pod -o wide | grep details | awk '{print $6}')
echo $DETAILS_IP
In the previous case the Details IP is still 10.131.1.100.
- Then let’s sniff the traffic that is sent from the ProductPage pod to the Details v1 pod by running:
kubectl sniff -i eth0 -o ./mtls-disabled.pcap $POD_PRODUCTPAGE -f '((tcp) and (net 10.131.1.100))' -n bookinfo -p -c istio-proxy
- Once we have the Kniff executed, we need to perform some requests:
curl $GATEWAY_URL -I
-
Then move to kubectl sniff terminal window and stop the process (Ctrl+C).
-
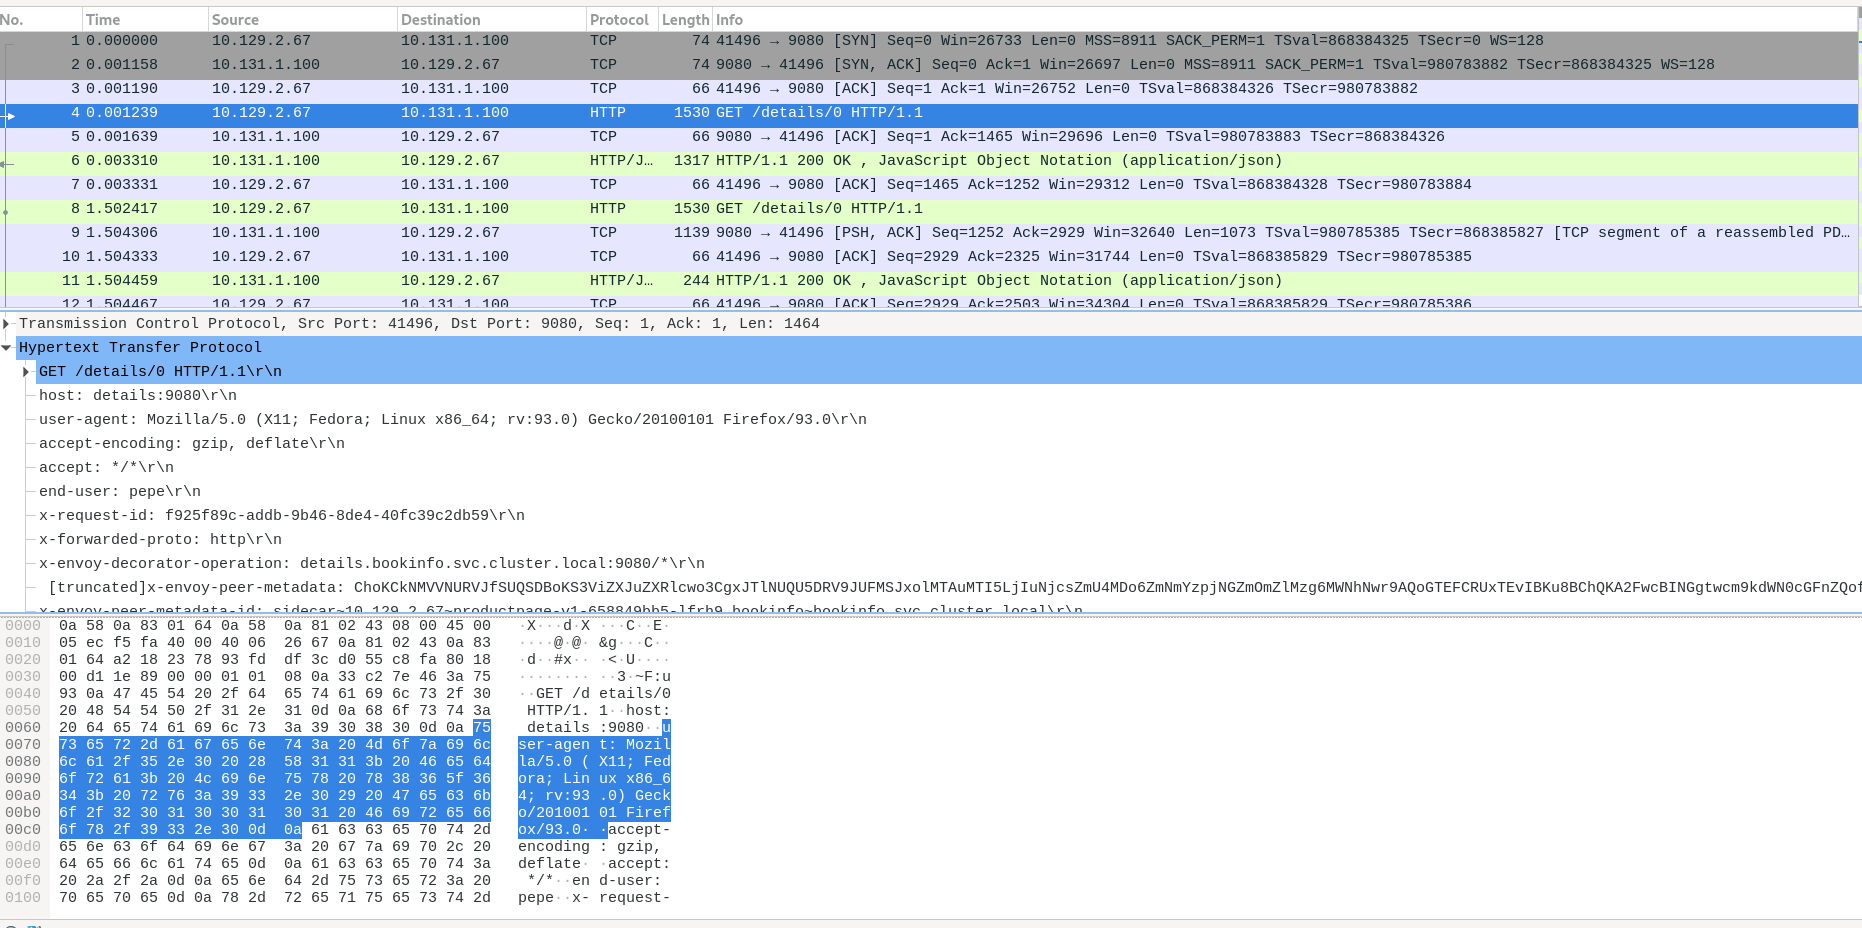
At the same directory, you have a file named mtls-disabled.pcap which is the captured traffic, you can use Wireshark to open the file, and you’ll see something like:
If you check the pcap file with Wireshark, now the traffic it’s NOT encrypted and it’s in Plain Text! So if anybody do a Man in the Middle attack we can leak sensitive information!
IMPORTANT: This is NOT recommended for production, but you already know that, isn’t? :D
E. Enforce mTLS with STRICT
Finally, let’s enforce the use of the mTLS in all of the inbound and outbound traffic using the mTLS mode STRICT.
E.1. Enable the STRICT mTLS value (without PeerAuth)
- Let’s deploy our setup enabling this time the mTLS to STRICT:
helm upgrade -i basic-gw-config -n ${DEPLOY_NAMESPACE} \
  --set control_plane_namespace=${CONTROL_PLANE_NAMESPACE} \
  --set control_plane_name=${CONTROL_PLANE_NAME} \
  --set route_hostname=$(oc get route ${CONTROL_PLANE_ROUTE_NAME} -n ${CONTROL_PLANE_NAMESPACE} -o jsonpath={'.spec.host'}) \
  basic-gw-config -f basic-gw-config/values-mtls-strict.yaml
- Check the PeerAuthentication for ensure that the mode STRICT is set:
kubectl get peerauthentications.security.istio.io default -o jsonpath='{.spec}' | jq .
{
  "mtls": {
    "mode": "STRICT"
  }
}
In Mode STRICT the connection is an mTLS tunnel (TLS with client cert must be presented).
NOTE: It may take some time before the mesh begins to enforce PeerAuthentication object. Please wait couple of minutes.
On the other hand, as we not enabled the automatic mTLS, and we have the PeerAuthentication to STRICT we need to create a DestinationRule resource for our application service.
- Create a destination rule to configure Maistra to use mTLS when sending requests to other services in the mesh.
kubectl get dr bookinfo-mtls -o jsonpath='{.spec}' | jq .
{
  "host": "*.bookinfo.svc.cluster.local",
  "trafficPolicy": {
    "tls": {
      "mode": "ISTIO_MUTUAL"
    }
  }
}
E.2. Test the Bookinfo as a External User (outside the OCP Cluster)
Let’s check if everything worked as expected with the STRICT mode enforced!
- Let’s do some requests from outside the cluster, simulating that we’re a regular user:
GATEWAY_URL=$(echo https://$(oc get route ${control_plane_route_name} -n ${control_plane_namespace} -o jsonpath={'.spec.host'})/productpage)

curl $GATEWAY_URL -I
- As expected the requests are all 200 OK, so everything good for our beloved users!
$ curl $GATEWAY_URL -I
HTTP/1.1 200 OK
content-type: text/html; charset=utf-8
content-length: 5179
server: istio-envoy
date: Tue, 26 Oct 2021 14:59:54 GMT
x-envoy-upstream-service-time: 54
set-cookie: 9023cfc9bfd45f5dc28756be7ac3bd3e=d8c5201aae101ce45ff167c09f1d6910; path=/; HttpOnly; Secure; SameSite=None
cache-control: private
E.3 Check the mTLS within/inside the Mesh
Let’s check within our pod inside our mesh and inside our OpenShift Cluster.
- Let’s execute some requests from inside the pod:
kubectl exec -ti deploy/inside-mesh -- bash
$ for i in {1..10}; do  curl -vI http://productpage:9080/productpage?u=normal && sleep 2; done
- As we can see all the requests must return HTTP 200 OK
E.4. Check the mTLS outside the Mesh
- Let’s test again the connection from outside the mesh (but inside our OpenShift Cluster):
kubectl exec -n bookinfo -ti deployment/outside-mesh -- bash
- Let’s execute some requests, exactly the same as before when we set the Permissive mode:
1000760000@outside-mesh-847dd9c646-6vj2b:/$ curl http://productpage:9080/productpage?u=normal -Iv
...
...
* Expire in 200 ms for 4 (transfer 0x560642d40c10)
* Connected to productpage (172.30.64.160) port 9080 (#0)
> HEAD /productpage?u=normal HTTP/1.1
> Host: productpage:9080
> User-Agent: curl/7.64.0
> Accept: */*
>
* Recv failure: Connection reset by peer
* Closing connection 0
curl: (56) Recv failure: Connection reset by peer
We can see that the curl from the curl pod failed with exit code 56 and Failed!! What’s happened?
This is because preference is now requiring encrypted communication over mutual TLS (STRICT) via a Peer Authentication Istio object, but the curl pod (which is outside the mesh) is not attempting to use mutual TLS.
With STRICT mode you can enforce that your workloads/microservices accepts ONLY encrypted connections (mTLS), but we need to be careful because if a service in your mesh is communicating with a service outside the mesh, strict mTLS could break communication between those services. Use permissive mode while you migrate your workloads to OpenShift Service Mesh!
And with that ends this deep dive about mTLS in Service Mesh!
Special thanks to Asier Cidón, Fran Perea and Ernesto Gonzalez for their wisdom, patience and always willing to help! You rock guys!
NOTE: Opinions expressed in this blog are my own and do not necessarily reflect that of the company I work for.
Hope that helps to anyone and Happy Meshing!!


